Delight in the festive spirit with our Grinch Crinkle Cookies, made with simple ingredients like cake mix, eggs, oil, and green food coloring. Easy and fun to bake, these cookies are perfect for adding a pop of color and joy to your holiday celebrations!

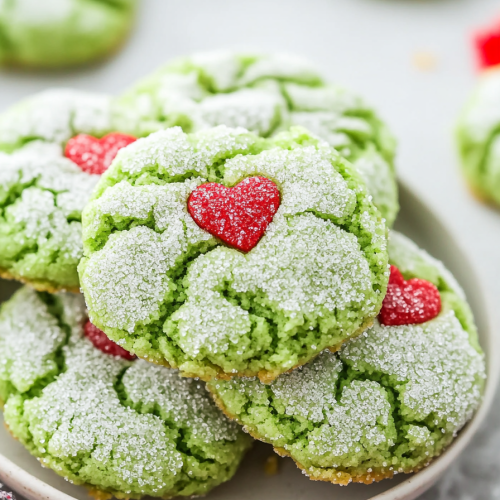
Every holiday season, my family dives into our treasure trove of beloved cookie recipes, but none quite capture the whimsy and cheer of our Grinch Crinkle Cookies. Inspired by the mischievously heartwarming character from Dr. Seuss, these cookies began as a fun baking project with my kids one chilly December afternoon. Wanting to add a touch of magic and a lesson of growth and kindness, we decided to bring the Grinch’s green hue and growing heart into our kitchen. Each cookie, with its bright green crackles and a single heart sprinkle, isn’t just a treat; it’s a reminder of the joy and transformation the holiday season brings.

Why You’ll Love Grinch Crinkle Cookies
Our Grinch Crinkle Cookies aren’t just delicious—they’re a holiday adventure in every bite! Perfect for bakers of all levels, these cookies bring a splash of color and heart to your festive gatherings.
- Easy Preparation: Utilizing a box cake mix means fewer ingredients to measure, making this recipe quick and straightforward.
- Kid-Friendly Fun: With simple steps and the joy of adding heart sprinkles, kids can easily get involved in the holiday baking fun.
- Vivid Presentation: The bright green color and distinctive crinkled texture make these cookies a standout addition to any holiday dessert table.
- Emotional Connection: Inspired by a classic holiday character, these cookies are sure to spark conversations and smiles at your holiday gatherings.

Ingredients Notes
To ensure your Grinch Crinkle Cookies turn out perfectly crinkly and festive, here are some helpful ingredient notes:
- Cake Mix: A simple vanilla or yellow cake mix works best as it allows the green color to shine through vividly.
- Oil & Eggs: These ingredients bind the mix together, ensuring a moist texture. Make sure your eggs are at room temperature for the best results.
- Green Food Coloring: Gel food coloring is recommended for a more vibrant color without altering the texture of the dough.
- Powdered Sugar: Rolling the dough balls in powdered sugar before baking not only adds sweetness but also enhances the crinkle effect during baking.
- Heart Sprinkles: These are a crucial part of the theme, adding a charming touch to each cookie. Placing them immediately after baking helps them stick.

WANT TO SAVE THIS RECIPE?
How To Make Grinch Crinkle Cookies
Follow these detailed steps to ensure your Grinch Crinkle Cookies come out perfectly crinkly and festive every time!
- Preparation: Start by preheating your oven to 350 degrees and lining your baking sheets with parchment paper. This ensures easy removal of cookies and clean-up.
- Mixing the Dough: In a stand mixer, blend the dry cake mix with oil and eggs until smooth. This forms the base of your cookie dough.
- Coloring the Dough: Introduce green food coloring gradually until you achieve a rich, vibrant green. Mixing thoroughly ensures an even color throughout.
- Chilling the Dough: Refrigerate the dough for at least one hour, or freeze for 30 minutes. This step is crucial for making the dough easier to handle and enhancing the crinkly texture.
- Shaping and Sugaring: Once chilled, form golf-ball-sized dough balls, roll them in powdered sugar, and space them out on your baking sheets. The powdered sugar not only adds sweetness but also helps create the signature crinkle look.
- Baking: Bake for 10-12 minutes until the edges are set. The timing is perfect for achieving a chewy center with a slightly crisp edge.
- Adding the Heart: Immediately press a heart sprinkle into the upper right corner of each cookie while they’re still hot. This ensures the sprinkle adheres well and symbolizes the Grinch’s heart growing three sizes!

Storage Options
Grinch Crinkle Cookies keep well, making them ideal for advance holiday baking. Once completely cooled, store them in an airtight container at room temperature for up to a week. For longer storage, you can freeze the cookies for up to three months, ensuring they’re wrapped tightly to maintain freshness and prevent freezer burn.

Variations and Substitutions
If you’re looking to tweak the Grinch Crinkle Cookies recipe to suit dietary needs or just to mix things up, here are some creative variations and substitutions:
- Gluten-Free Adaptation: Use a gluten-free cake mix to accommodate dietary restrictions without compromising on taste or texture.
- Different Colors: While green is traditional for the Grinch theme, feel free to experiment with other colors for different occasions.
- Alternative Sprinkles: If heart sprinkles are unavailable, use any festive sprinkle to maintain the holiday cheer.
- Flavor Twists: Add a teaspoon of vanilla or almond extract to the dough to introduce a new flavor layer, enhancing the simple cake mix base.
These tailored touches allow you to personalize the cookies, whether you’re catering to allergies or just in the mood to experiment with flavors and colors!

Grinch Crinkle Cookies
Ingredients
- 1 package of vanilla or yellow cake mix
- 1/2 cup of vegetable oil
- 2 whole eggs
- Green food coloring as needed
- 1/2 cup of powdered sugar for coating
- Jumbo heart-shaped sprinkles
Instructions
- Oven Preparation: Initiate by preheating the oven to a temperature of 350 degrees Fahrenheit. Meanwhile, prepare several baking sheets by lining them with parchment paper to facilitate easy removal of cookies and simplify cleanup.
- Dough Formation: In the mixing bowl of an electric stand mixer, combine the dry cake mix with the vegetable oil and eggs. Set the mixer on medium speed and blend for approximately two minutes until the mixture is smooth and homogeneous.
- Color Integration: Gradually introduce green food coloring to the mixture, continuing to mix until the color is uniformly distributed and reaches the desired intensity.
- Dough Cooling: Transfer the bowl containing the dough to a refrigerator and chill for one hour, or place it in a freezer for about 30 minutes. The dough should be cool to the touch and firm enough to handle without sticking.
- Forming Cookies: Remove the dough from cooling and shape into balls approximately the size of a golf ball. Roll each ball in powdered sugar until fully coated and arrange on the prepared baking sheets, ensuring at least two inches of space around each to accommodate spreading during baking.
- Baking: Place the baking sheets in the preheated oven and bake for 10-12 minutes, or until the edges of the cookies are firm but the centers remain slightly soft and not shiny.
- Final Touch: Promptly after removing the cookies from the oven, press a jumbo heart-shaped sprinkle into the upper right corner of each cookie to mimic the placement of a heart. This should be done while the cookies are still hot to ensure the sprinkle adheres properly.
- Cooling: Allow the cookies to rest on the baking sheet for approximately five minutes before transferring them to a cooling rack. The cookies will continue to firm up as they cool.



One Response
Cute, gonna add peppermint.