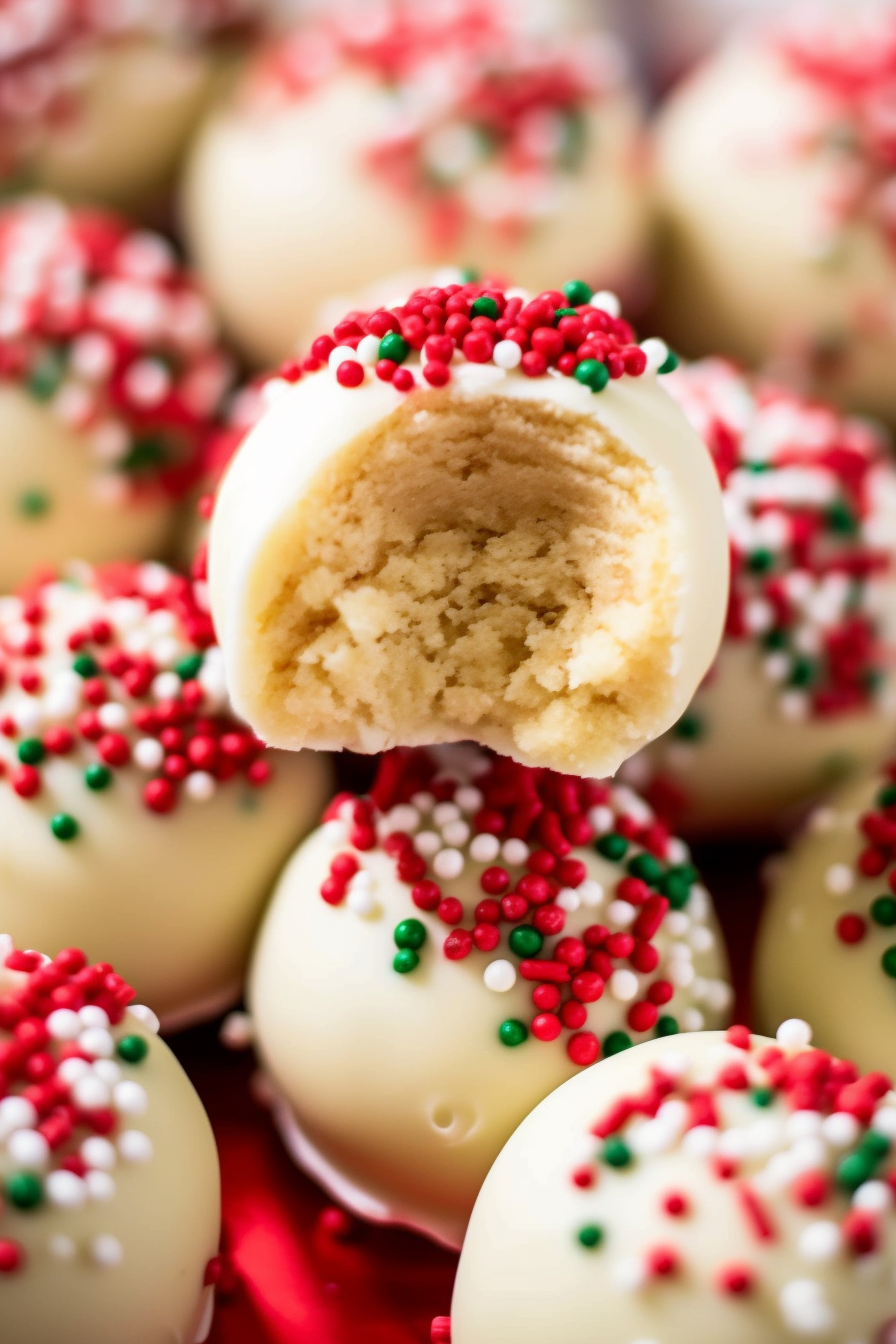
Indulge in the delightful simplicity of Sugar Cookie Truffles, a no-bake treat crafted with just four essential ingredients: sugar cookies, cream cheese, vanilla extract, and chocolate melting wafers. Perfect for holiday gatherings, this recipe promises a deliciously easy homemade experience.

Every time I make these Sugar Cookie Truffles, I’m taken back to a cozy winter evening at my grandmother’s kitchen. It was a holiday tradition for us to bake together, but one year, we were short on time. Grandma, with her usual culinary flair, decided to improvise. We had a bag of sugar cookies, some leftover cream cheese, and her ever-present stash of chocolate. We laughed and chatted as we crushed cookies and rolled the mixture into balls, marveling at how such simple ingredients could create something so decadent. These truffles became our new holiday staple, a sweet reminder of that impromptu baking session that turned into one of my fondest memories.

Why You’ll Love Sugar Cookie Truffles
These Sugar Cookie Truffles stand out for their effortless elegance and versatility. They require no baking, making them perfect for those who want a quick, yet luxurious treat. The use of readily available ingredients like sugar cookies and cream cheese ensures a hassle-free preparation. The truffles are also a canvas for creativity – whether it’s experimenting with different cookie types or chocolate flavors, there’s always room for a personal touch. Their crowd-pleasing appeal makes them ideal for any gathering, ensuring a delightful experience for both the baker and the recipients.

Ingredients Notes for Sugar Cookie Truffles
These truffles are a dream for anyone who loves to keep things simple yet delicious.
Sugar cookies form the base, offering a sweet and crumbly texture. Opt for a high-quality brand like Pepperidge Farms for the best flavor.
Cream cheese adds a creamy richness and helps bind the ingredients. Ensure it’s softened for easier mixing.
Vanilla extract enhances the overall flavor, lending a subtle depth.
WANT TO SAVE THIS RECIPE?
Finally, chocolate melting wafers provide a smooth coating that not only tastes great but also gives the truffles a professional finish. The best part? You only need a handful of these ingredients to create a batch of mouth-watering truffles!
How To Make Sugar Cookie Truffles
Creating these Sugar Cookie Truffles is a delightful and straightforward process. Each step, from crushing the cookies to dipping the truffles in chocolate, is infused with simplicity and joy.
- Cookie Crumb Creation: Start by transforming your sugar cookies into fine crumbs using a blender or food processor. This step is crucial for achieving the perfect texture for your truffle base.
- Mixing in Creaminess: Add the softened cream cheese and vanilla extract to the cookie crumbs. Pulse the mixture until it’s well combined and reaches a moldable consistency. If it’s too firm, feel free to add a bit more cream cheese to soften.
- Forming the Truffles: Line a baking sheet with parchment paper. Scoop out small portions of the mixture and roll them into balls. Place these on the baking sheet and freeze for about 20 minutes, which helps them firm up and makes them easier to coat in chocolate.
- Melting the Chocolate: Melt your chocolate wafers in a microwave-safe bowl. Do this in intervals to avoid burning the chocolate, stirring between each interval until the chocolate is perfectly smooth.
- Dipping and Decorating: Dip each truffle ball into the melted chocolate using a fork. Gently tap off excess chocolate, then use a toothpick to slide the truffle back onto the baking sheet. This is the moment to get creative – add sprinkles or any other decoration immediately after dipping.
- Final Touch: Once all truffles are coated and decorated, refrigerate them until they are set and ready to serve. Enjoy the fruits of your minimal labor with these irresistibly charming treats!

Storage Options for Sugar Cookie Truffles
The beauty of these Sugar Cookie Truffles lies in their ease of storage. Once prepared, they can be kept in the refrigerator for up to a week, making them a convenient treat for unexpected guests or sudden sweet cravings. For longer storage, they can be frozen in an airtight container for up to a month. Just remember to thaw them in the refrigerator for a few hours before serving to ensure the perfect texture and taste.
Variations and Substitutions for Sugar Cookie Truffles
- Cookie Varieties: Feel free to experiment with different types of cookies for the base. Oreo, ginger snaps, or even homemade cookies can offer a unique twist.
- Cream Cheese Alternatives: For a lighter version, you can use low-fat cream cheese or even mascarpone for a richer flavor.
- Flavor Add-Ins: Mix in a dash of cinnamon, almond extract, or even citrus zest to the truffle mix for an extra flavor kick.
- Chocolate Choices: Don’t limit yourself to just one type of chocolate for coating. White, dark, or even flavored chocolate can add a new dimension to your truffles.
- Decorative Dazzle: Go beyond sprinkles. Top your truffles with crushed nuts, coconut flakes, or even edible gold leaf for a touch of luxury.
With these tips and variations, you’re ready to embark on a delightful culinary adventure with Sugar Cookie Truffles that are sure to impress!


Sugar Cookie Truffles
Ingredients
- Sugar Cookies: 12-15 pieces preferably Pepperidge Farms (equivalent to a 5-ounce bag)
- Cream Cheese: 2-3 ounces softened to room temperature
- Vanilla Extract: ½ teaspoon
- Chocolate Melting Wafers: 1 ½ cups
Instructions
- Preparation of Cookie Base: Begin by placing the sugar cookies in a blender or food processor. Process the cookies until they are reduced to fine crumbs. This step is critical for achieving the desired texture for the truffles.
- Combining Ingredients: To the cookie crumbs, add the softened cream cheese and vanilla extract. Pulse the mixture in the blender or food processor until the ingredients are thoroughly combined and the mixture attains a consistency suitable for molding. Should the mixture be overly firm, consider adding an additional ounce of cream cheese to adjust the texture.
- Forming the Truffles: Line a baking sheet with parchment paper or freezer paper. Utilize a small cookie scoop or tablespoon to portion the dough, rolling each portion into a ball. Place the balls onto the prepared baking sheet and proceed to freeze them for approximately 20 minutes, or until they are firm.
- Melting the Chocolate: Place the chocolate melting wafers in a microwave-safe bowl. Heat the chocolate in the microwave for 1 minute, then stir thoroughly. If not completely melted, continue to heat in 15-30 second intervals, stirring between each, until the chocolate is fully melted and smooth.
- Coating the Truffles: Dip each frozen truffle ball into the melted chocolate, using a fork to facilitate this process. Gently tap the fork against the side of the bowl to remove excess chocolate. Utilize a toothpick to transfer the chocolate-coated truffle back onto the lined baking sheet.
- Decoration: Immediately following the dipping of each truffle in chocolate, apply sprinkles or other decorative toppings as desired. Once all truffles are coated and decorated, place them in the refrigerator until they are set and ready to be served.

